Cs329s Ml Deployment Tutorial Save
Code and files to go along with CS329s machine learning model deployment tutorial.
CS329s Machine Learning Model Deployment Tutorial
Warning: Following the steps of what's in here may cost you money (Google Cloud is a paid service), be sure to shut down any Google Cloud service you no longer need to use to avoid charges.
Thank you to: Mark Douthwaite's incredible ML + software engineering blog, Lj Miranda's amazing post on software engineering tools for data scientists, Chip Huyen and Ashik Shafi's gracious feedback on the raw materials of this tutorial.
What is in here?
Code and files to go along with CS329s machine learning model deployment tutorial.
- Watch the video tutorial on YouTube
- See the slides
- Get the model training code
What do I need to get started?
- A Google Cloud account and a Google Cloud Project
- Google Cloud SDK installed (gcloud CLI utitly)
- Trained machine learning model(s), our app uses an image classification model trained on a number of different classes of food from Food101 dataset
- Docker installed
Warning (again): Using Google Cloud services costs money. If you don't have credits (you get $300USD when you first sign up), you will be charged. Delete and shutdown your work when finished to avoid charges.
What will I end up with?
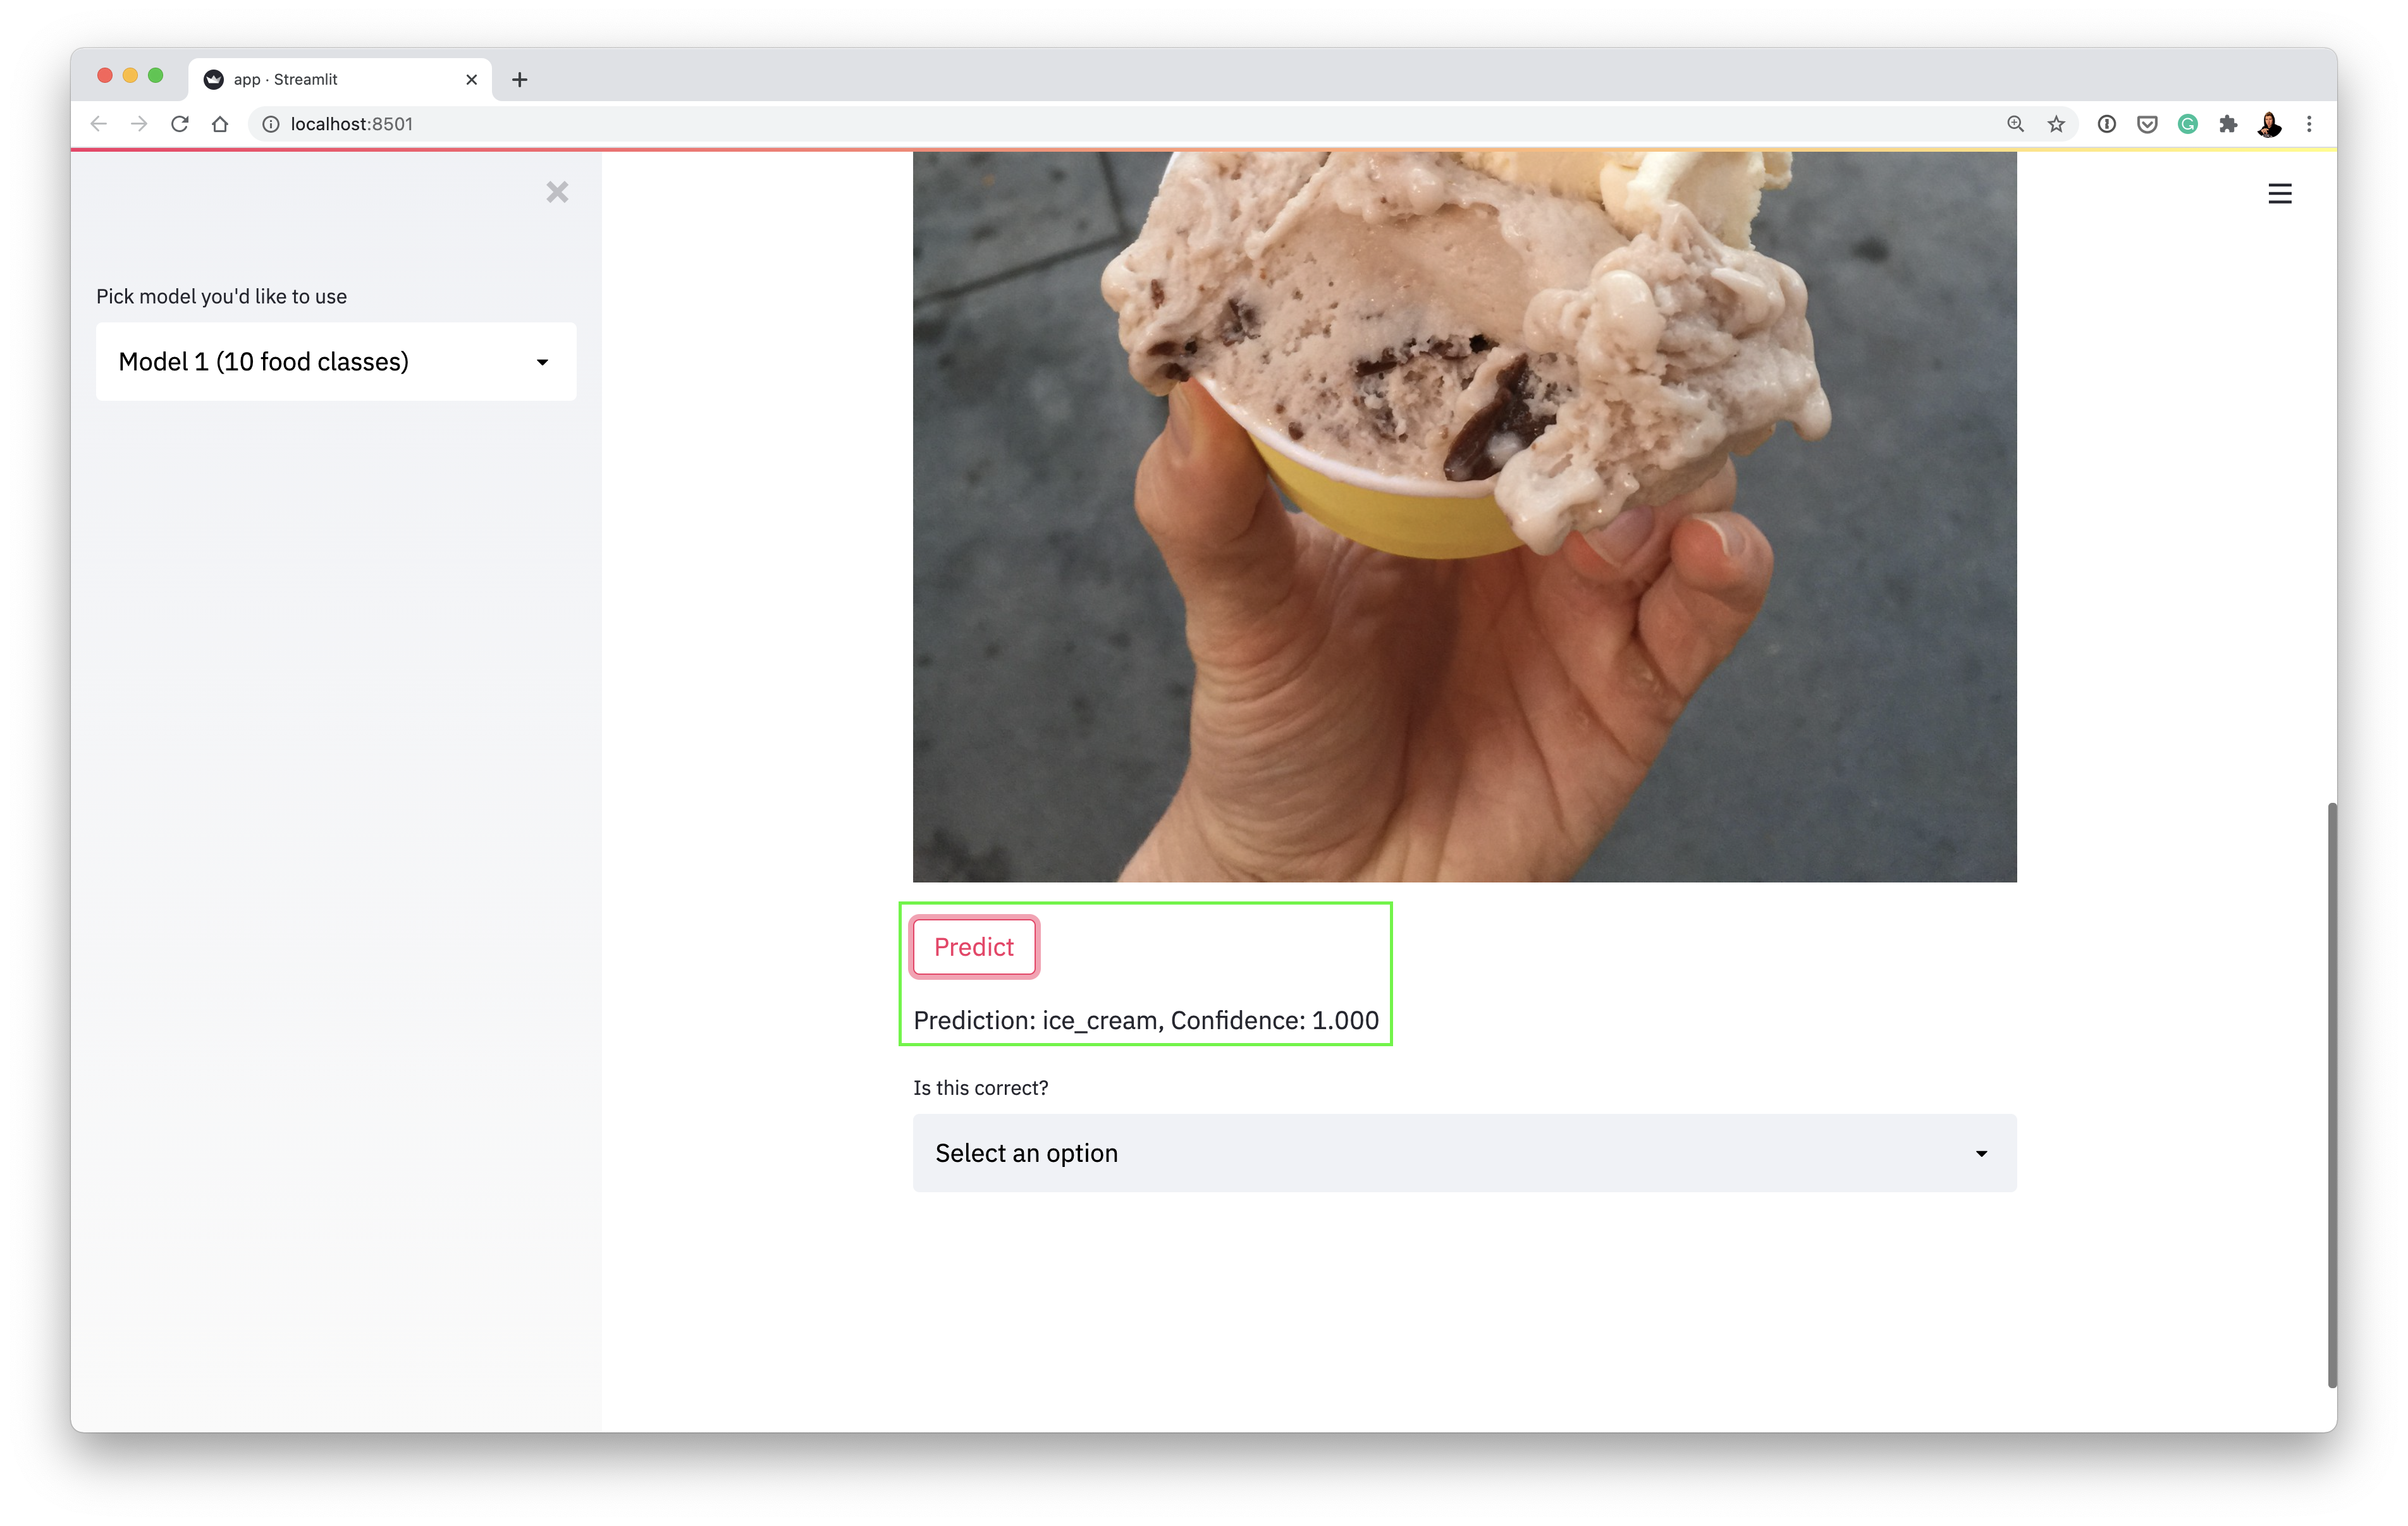
If you go through the steps below without fail, you should end up with a Streamlit-powered web application (Food Vision 🍔👁) for classifying images of food (deployed on Google Cloud if you want).
Our app running locally making a prediction on an image of ice cream (using a machine learning model deployed on Google Cloud):

Okay, I'm in, how can I use it?
We're going to tackle this in 3 parts:
- Getting the app running (running Streamlit on our local machines)
- Deploying a machine learning model to AI Platform (getting Google Cloud to host one of our models)
- Deploying our app to App Engine (getting our app on the internet)
1. Getting the app running
- Clone this repo
git clone https://github.com/mrdbourke/cs329s-ml-deployment-tutorial
- Change into the
food-visiondirectory
cd food-vision
- Create and activate a virtual environment (call it what you want, I called mine "env")
pip install virtualenv
virtualenv <ENV-NAME>
source <ENV-NAME>/bin/activate
- Install the required dependencies (Streamlit, TensorFlow, etc)
pip install -r requirements.txt
- Activate Streamlit and run
app.py
streamlit run app.py
Running the above command should result in you seeing the following:
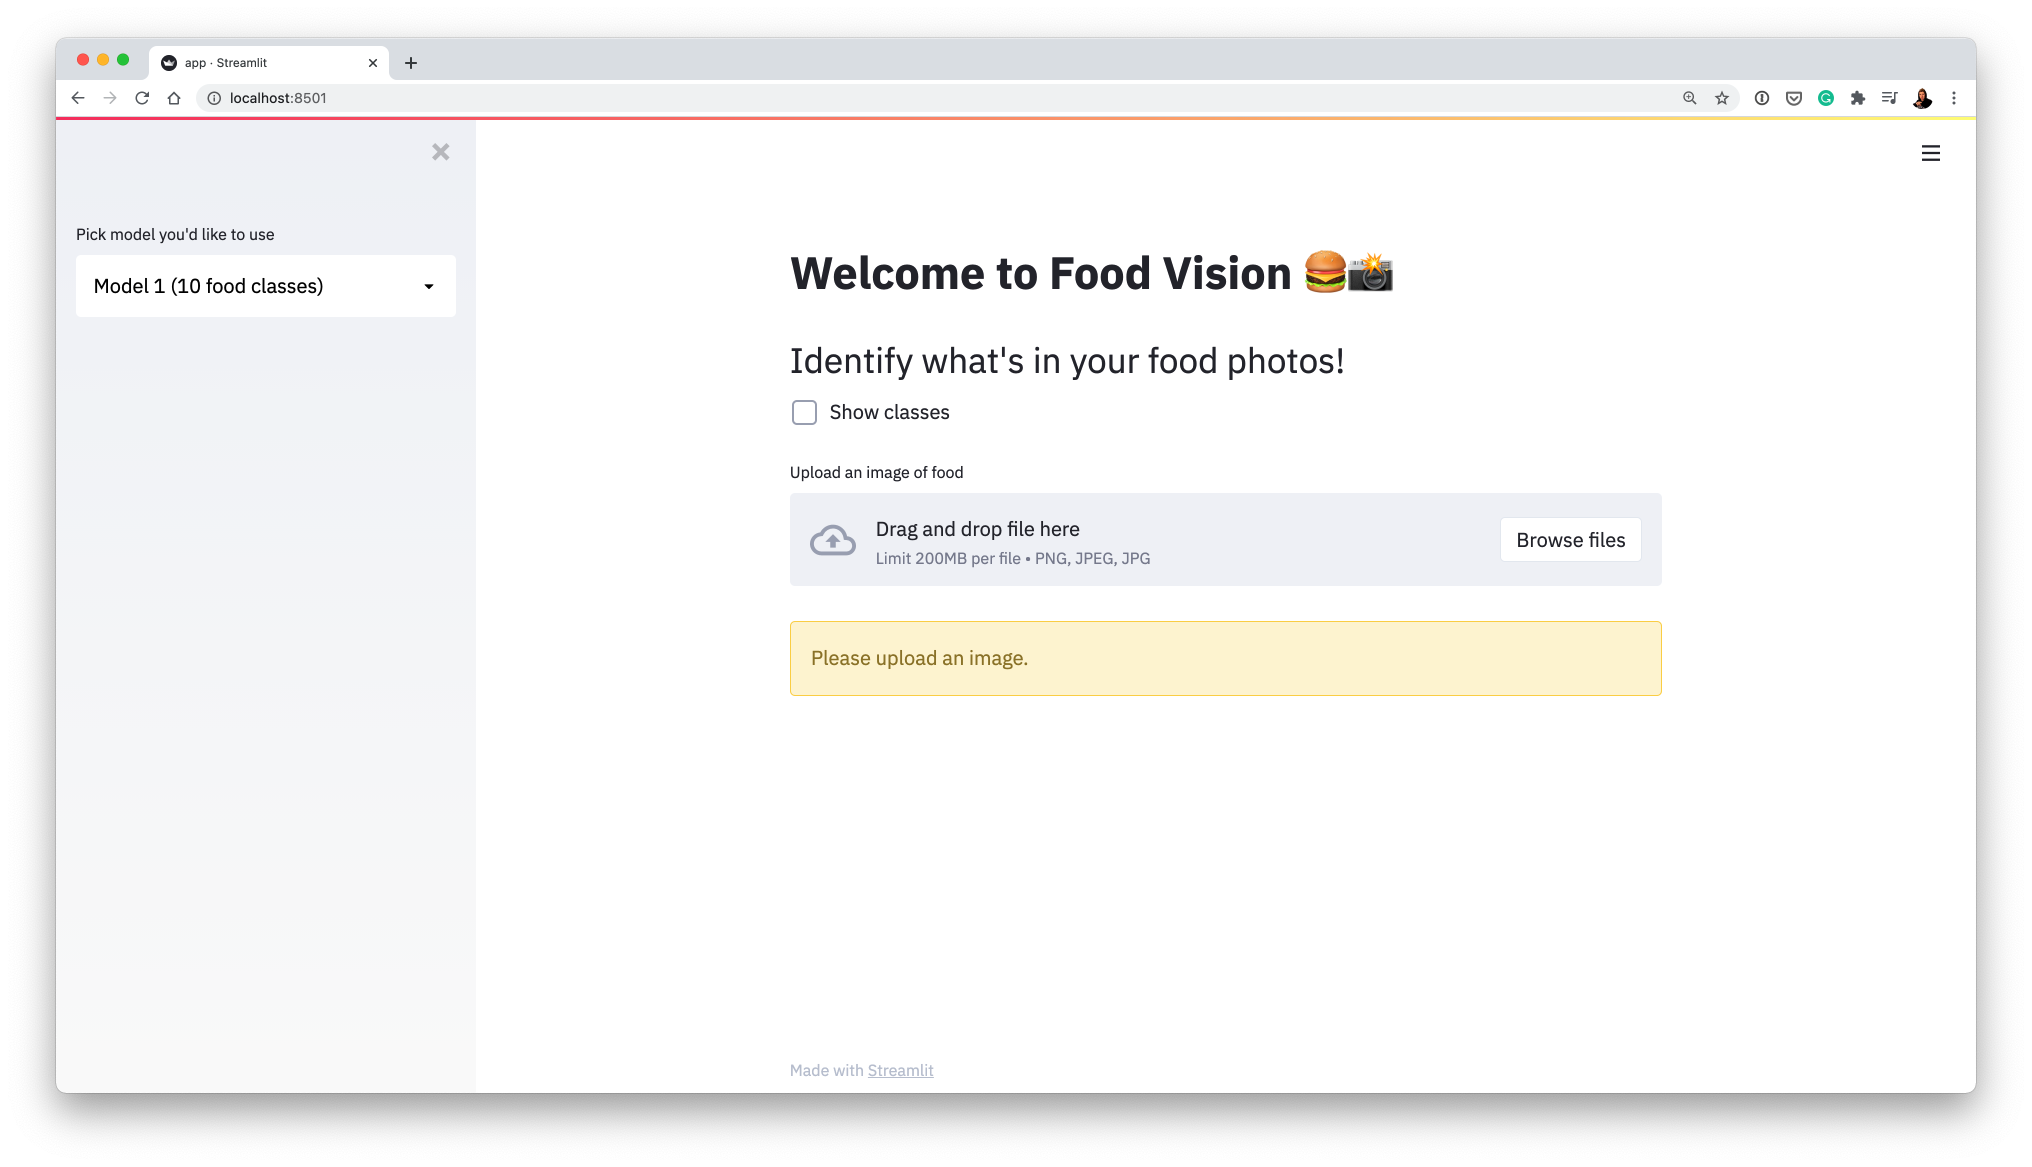
This is Food Vision 🍔👁 the app we're making.
-
Try an upload an image (e.g. one of the ones in
food-images/such asice_cream.jpegand it should load. -
Notice a "Predict" button appears when you upload an image to the app, click it and see what happens.
-
The app breaks because it tries to contact Google Cloud Platform (GCP) looking for a machine learning model and it either:
- won't be able to find the model (wrong API call or the model doesn't exist)
- won't be able to use the existing model because the credentials are wrong (seen below)
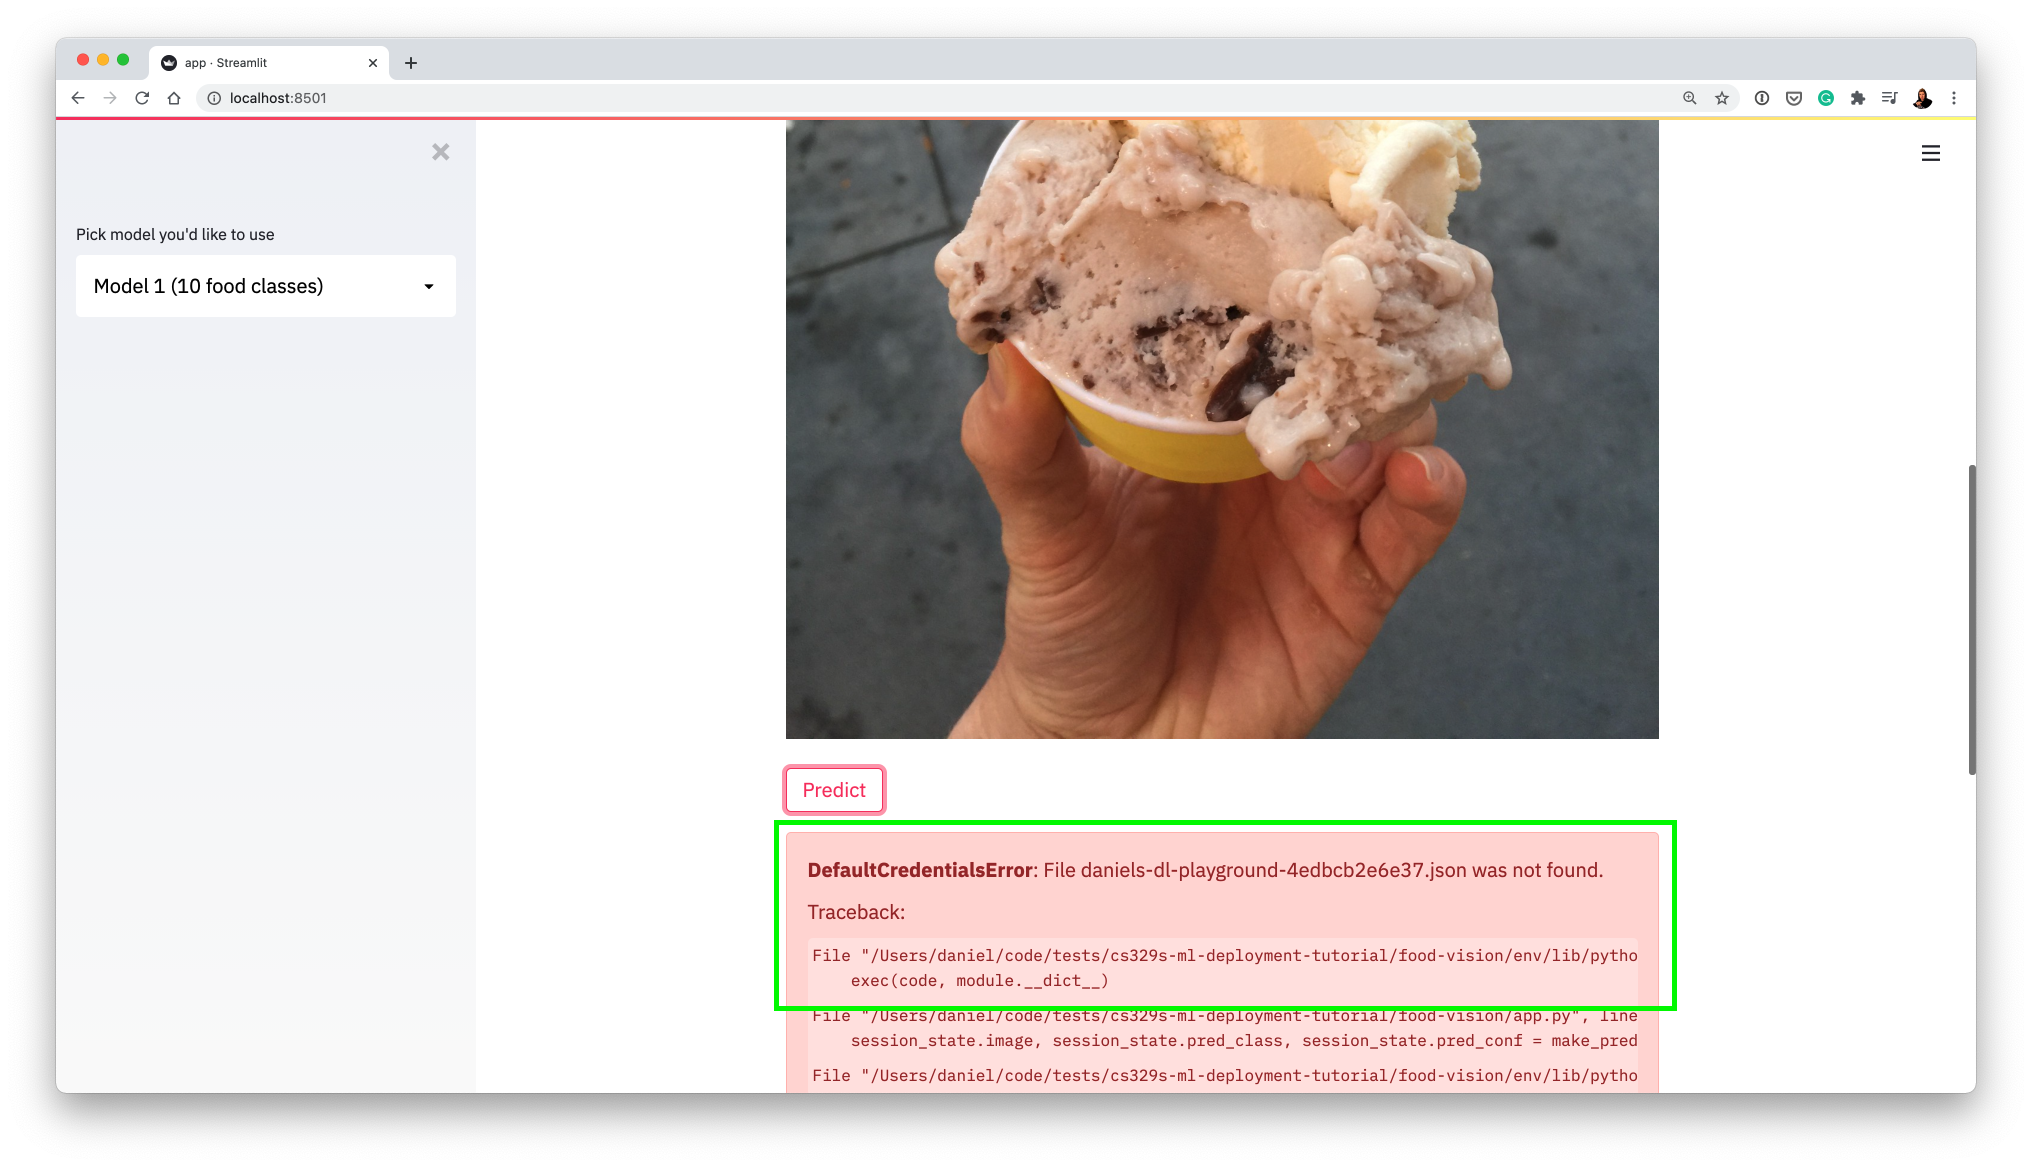
This is a good thing! It means our app is trying to contact GCP (using functions in food-vision/app.py and food-vision/utils.py).
Now let's learn how to get a model hosted on GCP.
2. Getting a machine learning model hosted on GCP
How do I fix this error? (Streamlit can't access your model)
To fix it, we're going to need a couple of things:
- A trained machine learning model (suited to our problem, we'll be uploading this to Google Storage)
- A Google Storage bucket (to store our trained model)
- A hosted model on Google AI Platform (we'll connect the model in our Google Storage bucket to here)
- A service key to access our hosted model on Google AI Platform
Let's see how we'll can get the above.
-
To train a machine learning model and save it in the
SavedModelformat (this TensorFlow specific, do what you need for PyTorch), we can follow the steps inmodel_training.ipynb. -
Once we've got a
SavedModel, we'll upload it Google Storage but before we do that, we'll need to create a Google Storage Bucket (a bucket is like a hard drive on the cloud).
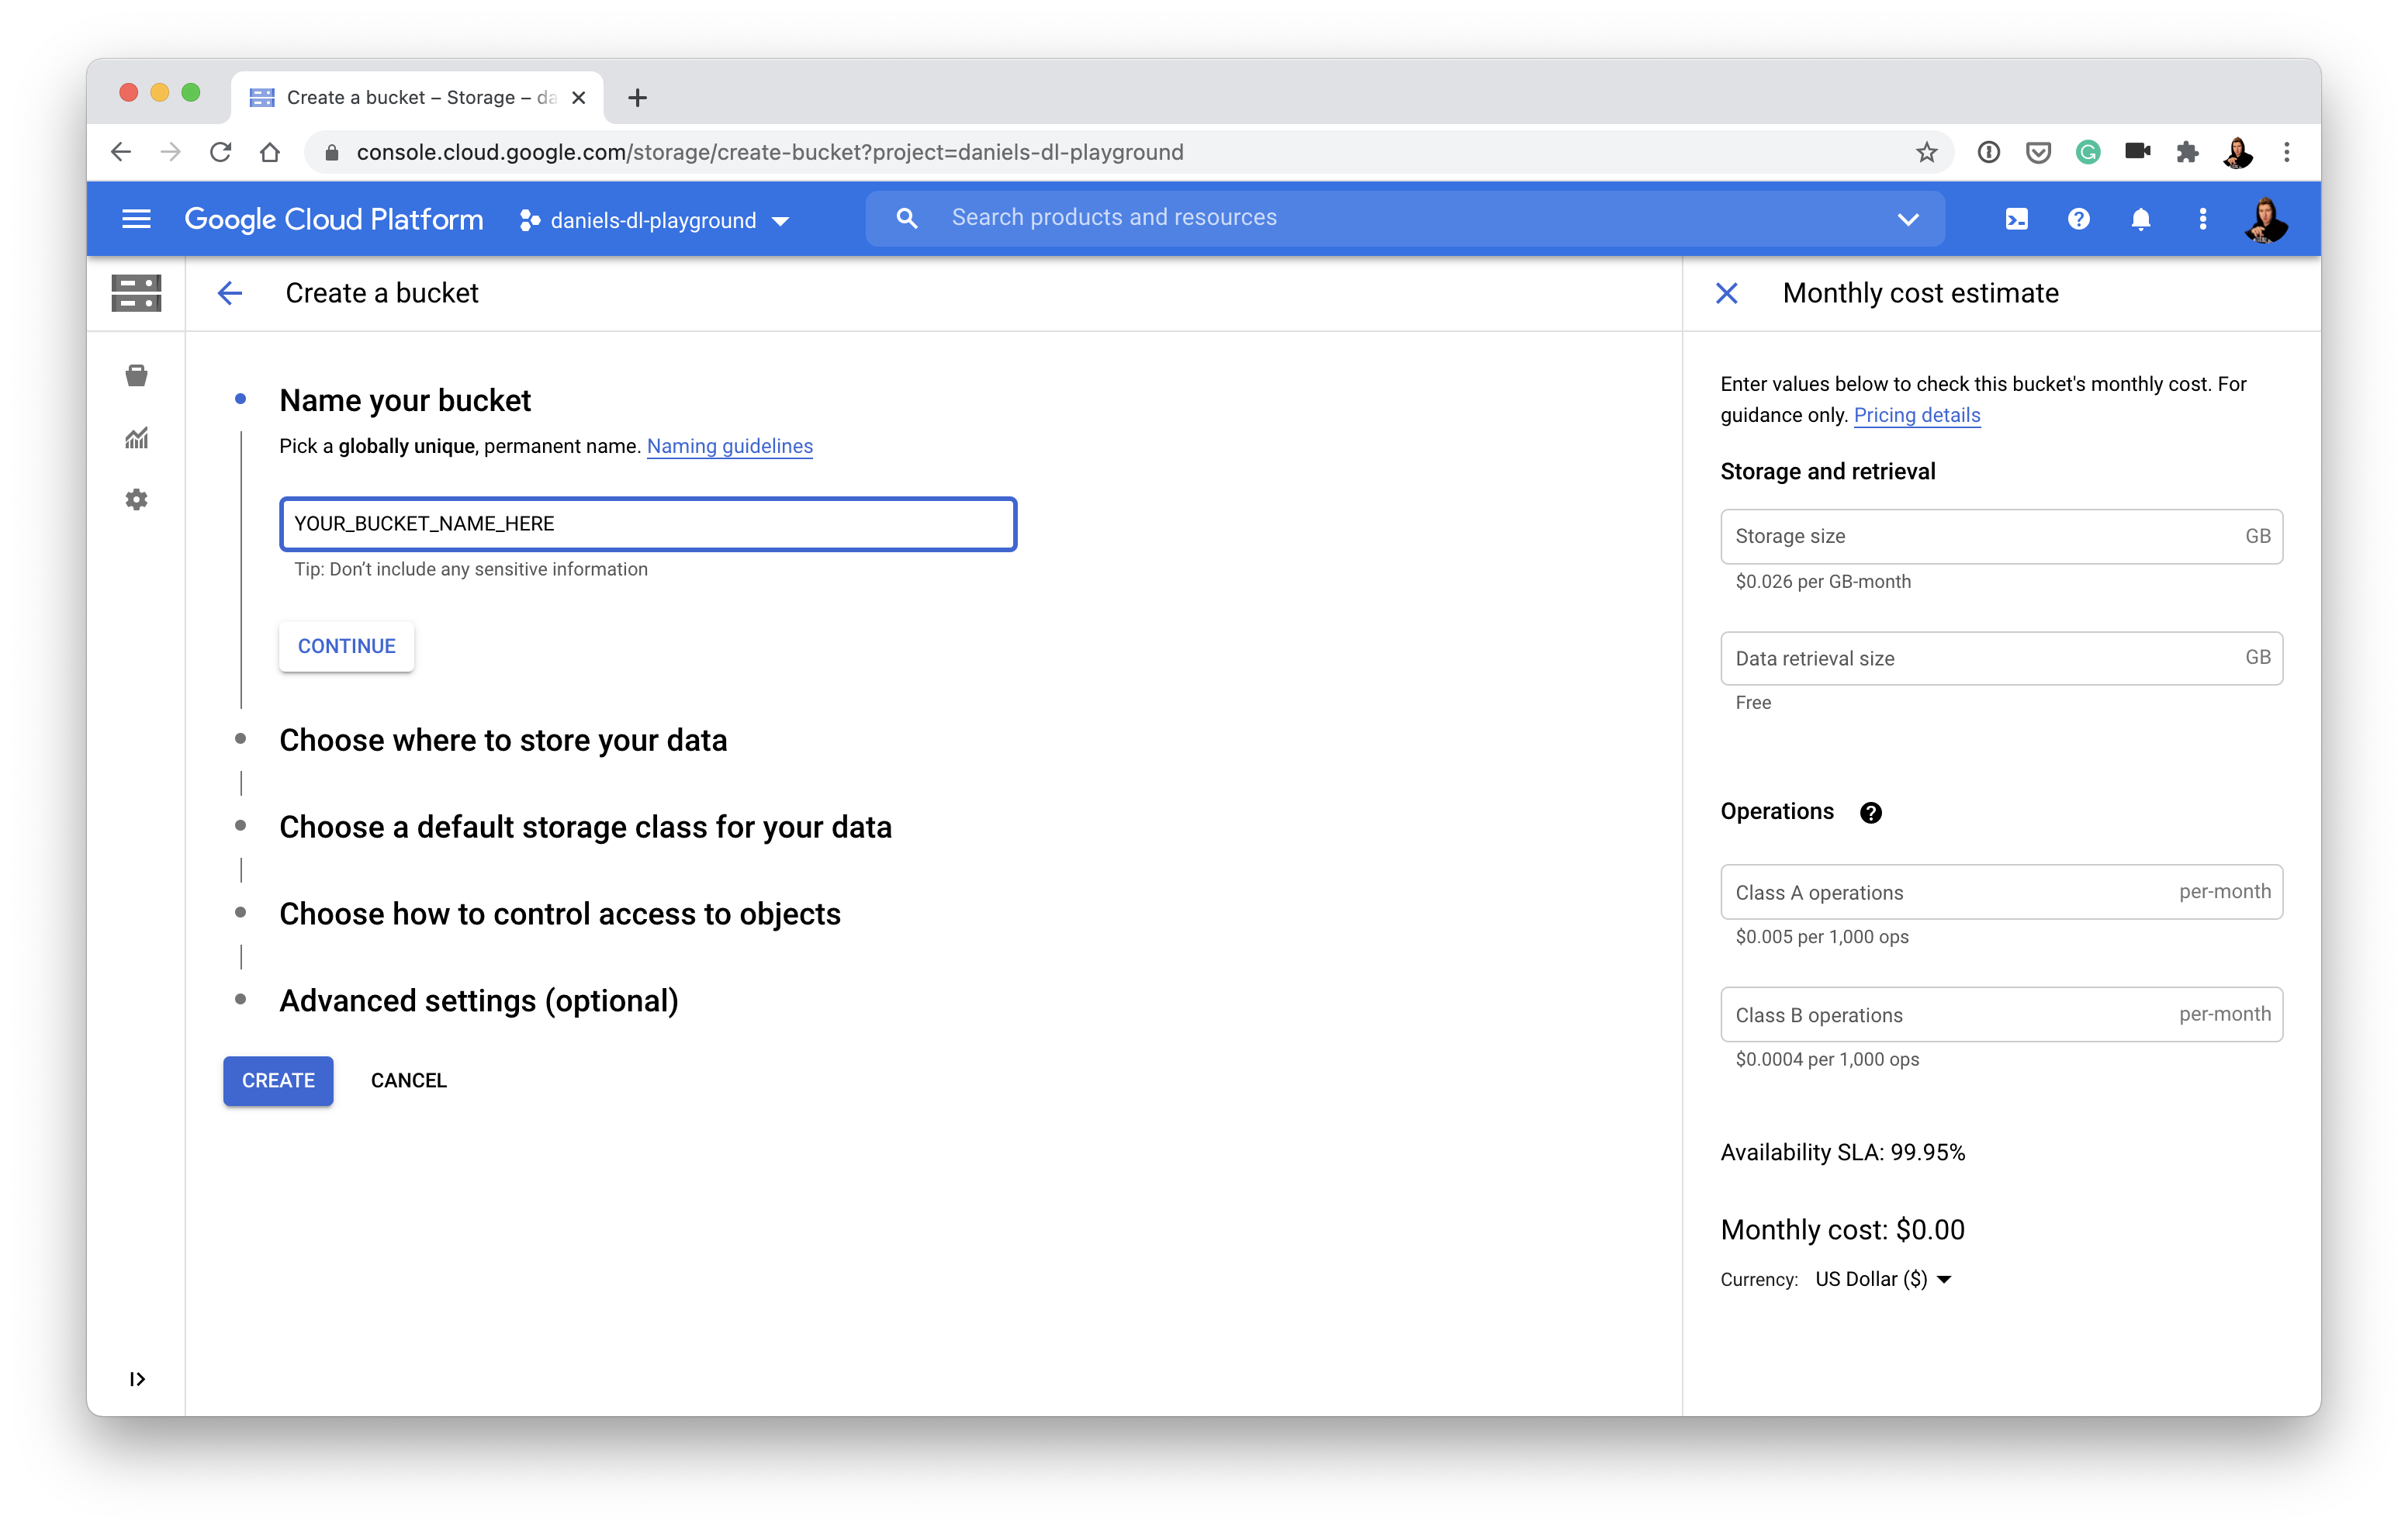
Call your bucket whatever you like (e.g. my_cool_bucket_name). You'll want to store your data in a region which is either closest to you or wherever you're allowed to store data (if this doesn't make sense, store it in the US).
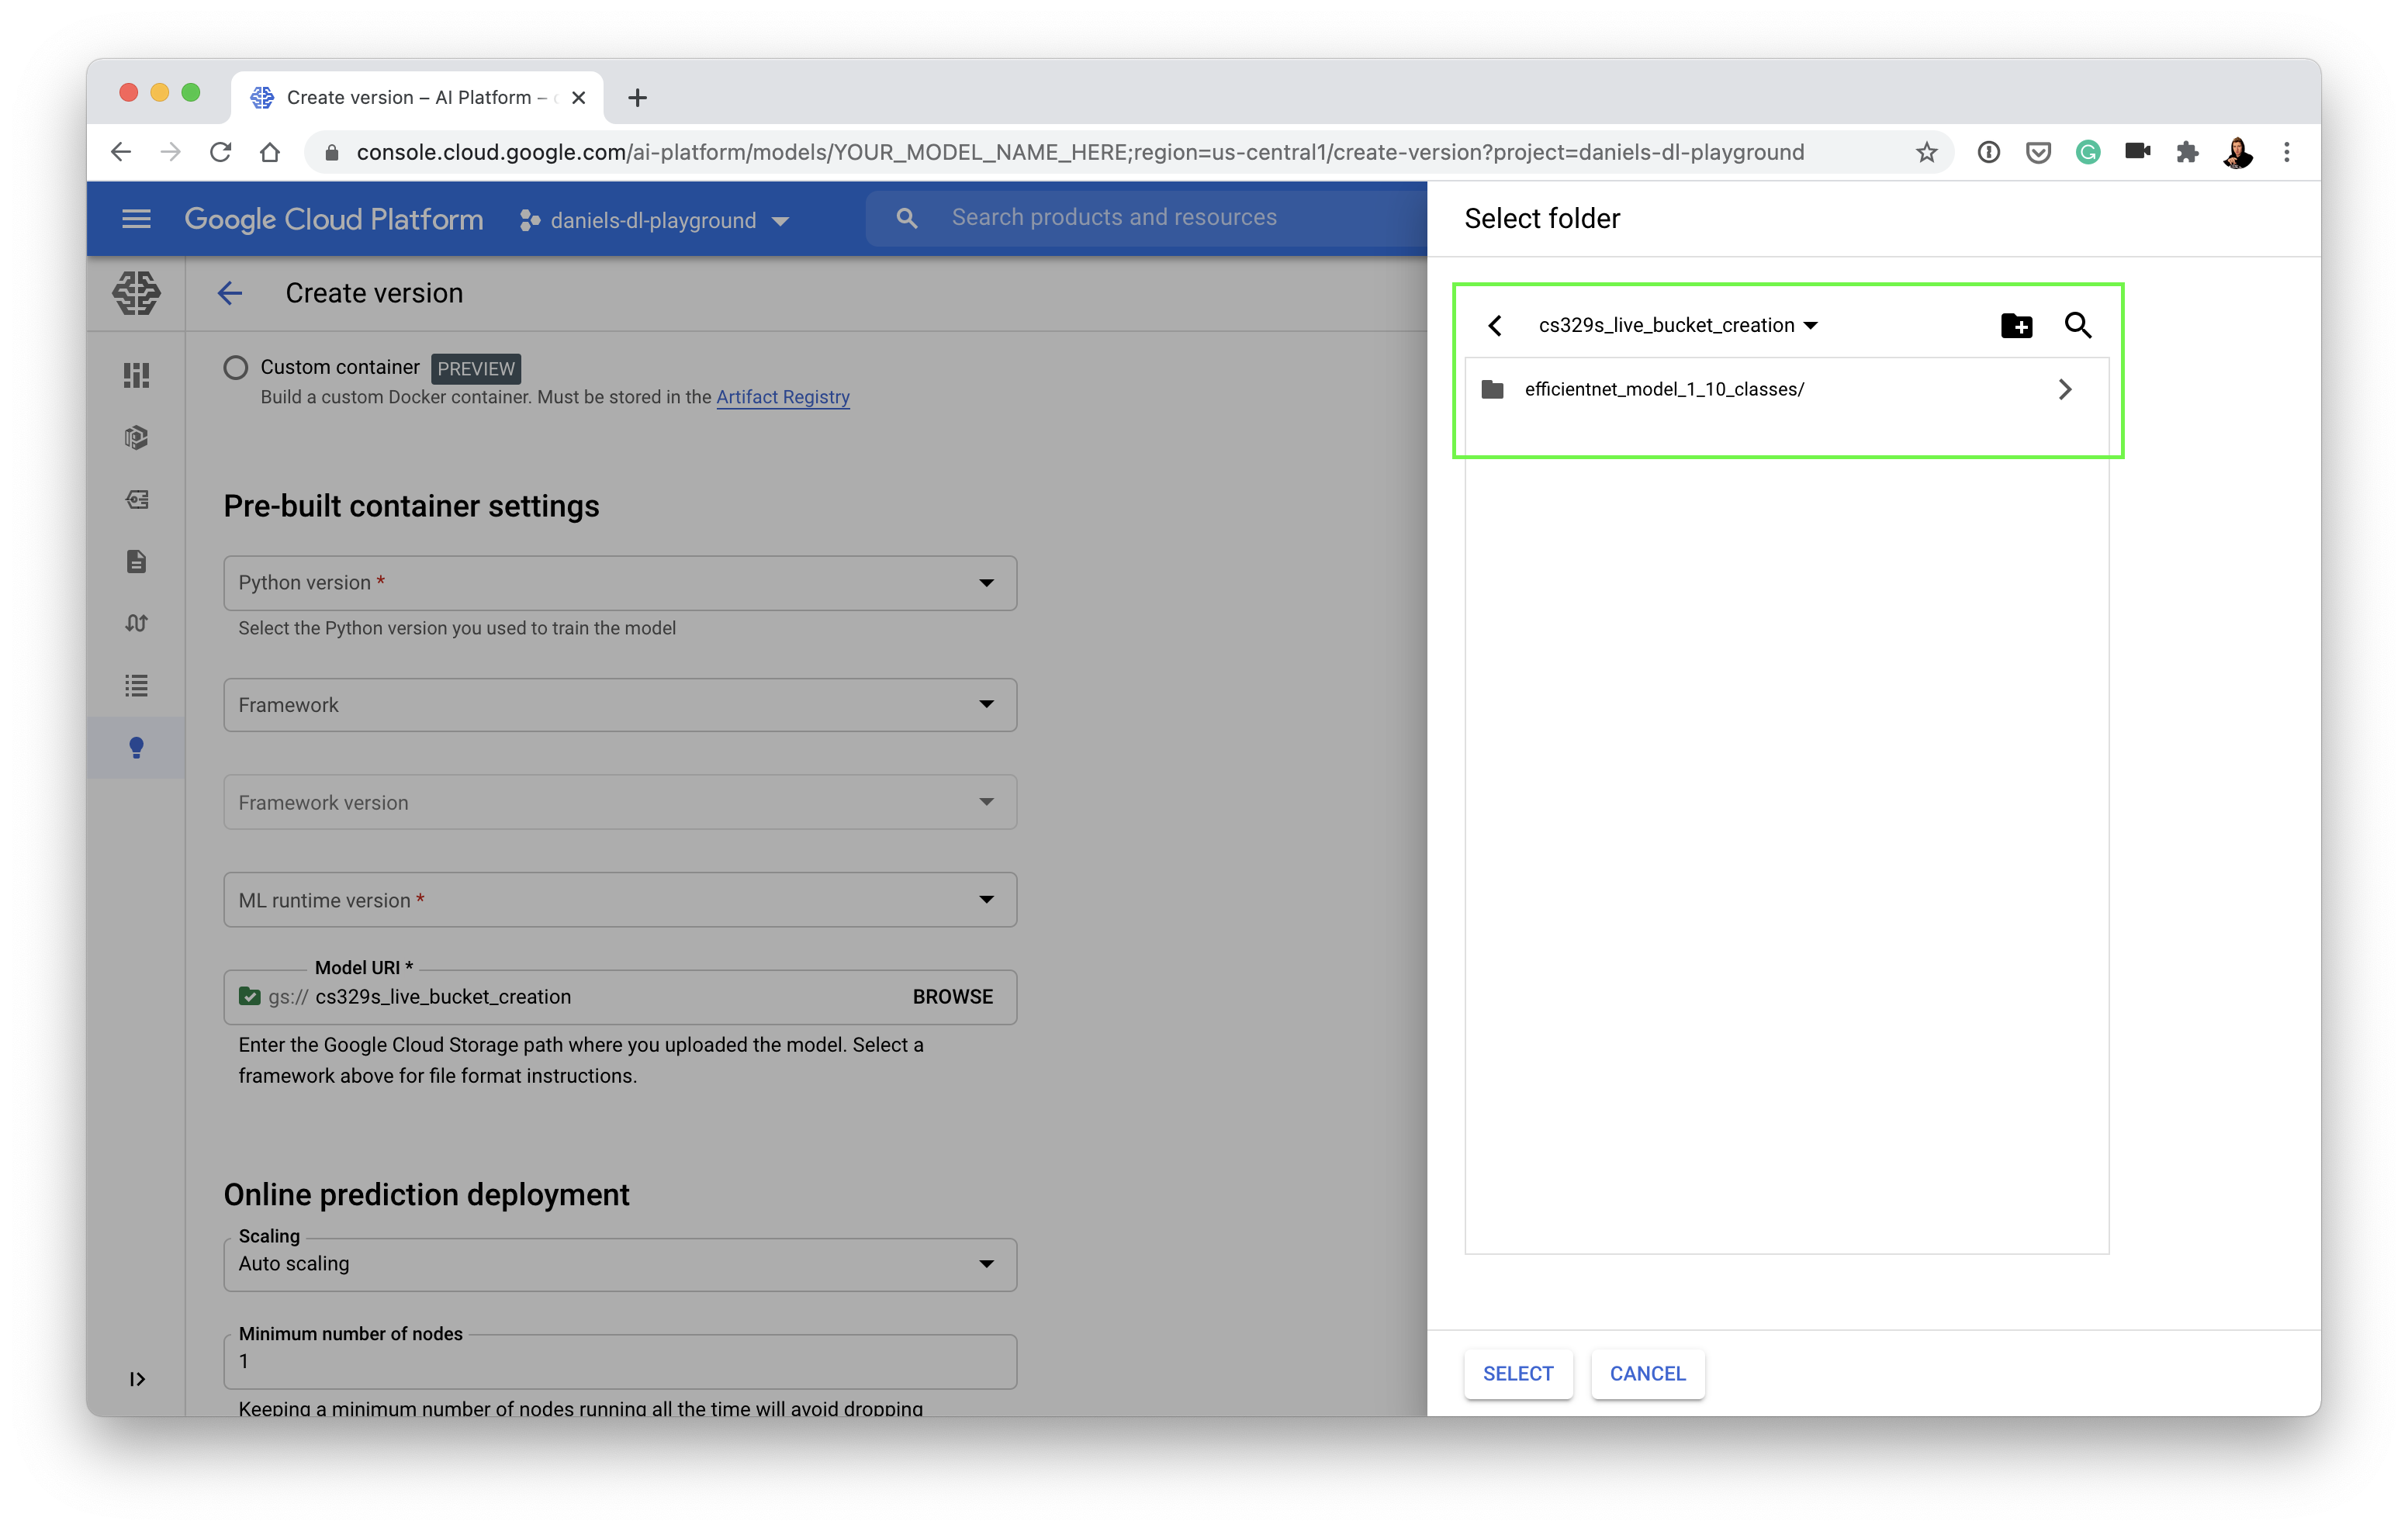
- With a bucket created, we can copy our model to the bucket.
## Uploading a model to Google Storage from within Colab ##

# Authorize Colab and initalize gcloud (enter the appropriate inputs when asked)
from google.colab import auth
auth.authenticate_user()
!curl https://sdk.cloud.google.com | bash
!gcloud init

# Upload SavedModel to Google Storage Bucket
!gsutil cp -r <YOUR_MODEL_PATH> <YOUR_GOOGLE_STORAGE_BUCKET>
- Connect model in bucket to AI Platform (this'll make our model accessible via an API call, if you're not sure what an API call is, imagine writing a function that could trigger our model from anywhere on the internet)
- Don't like clicking around Google Cloud's console? You can also use
gcloudto create a model in AI Platform on the command line - Create a model on AI Platform (choose a region which is closest to you or where you'd like your model to be accessed from):
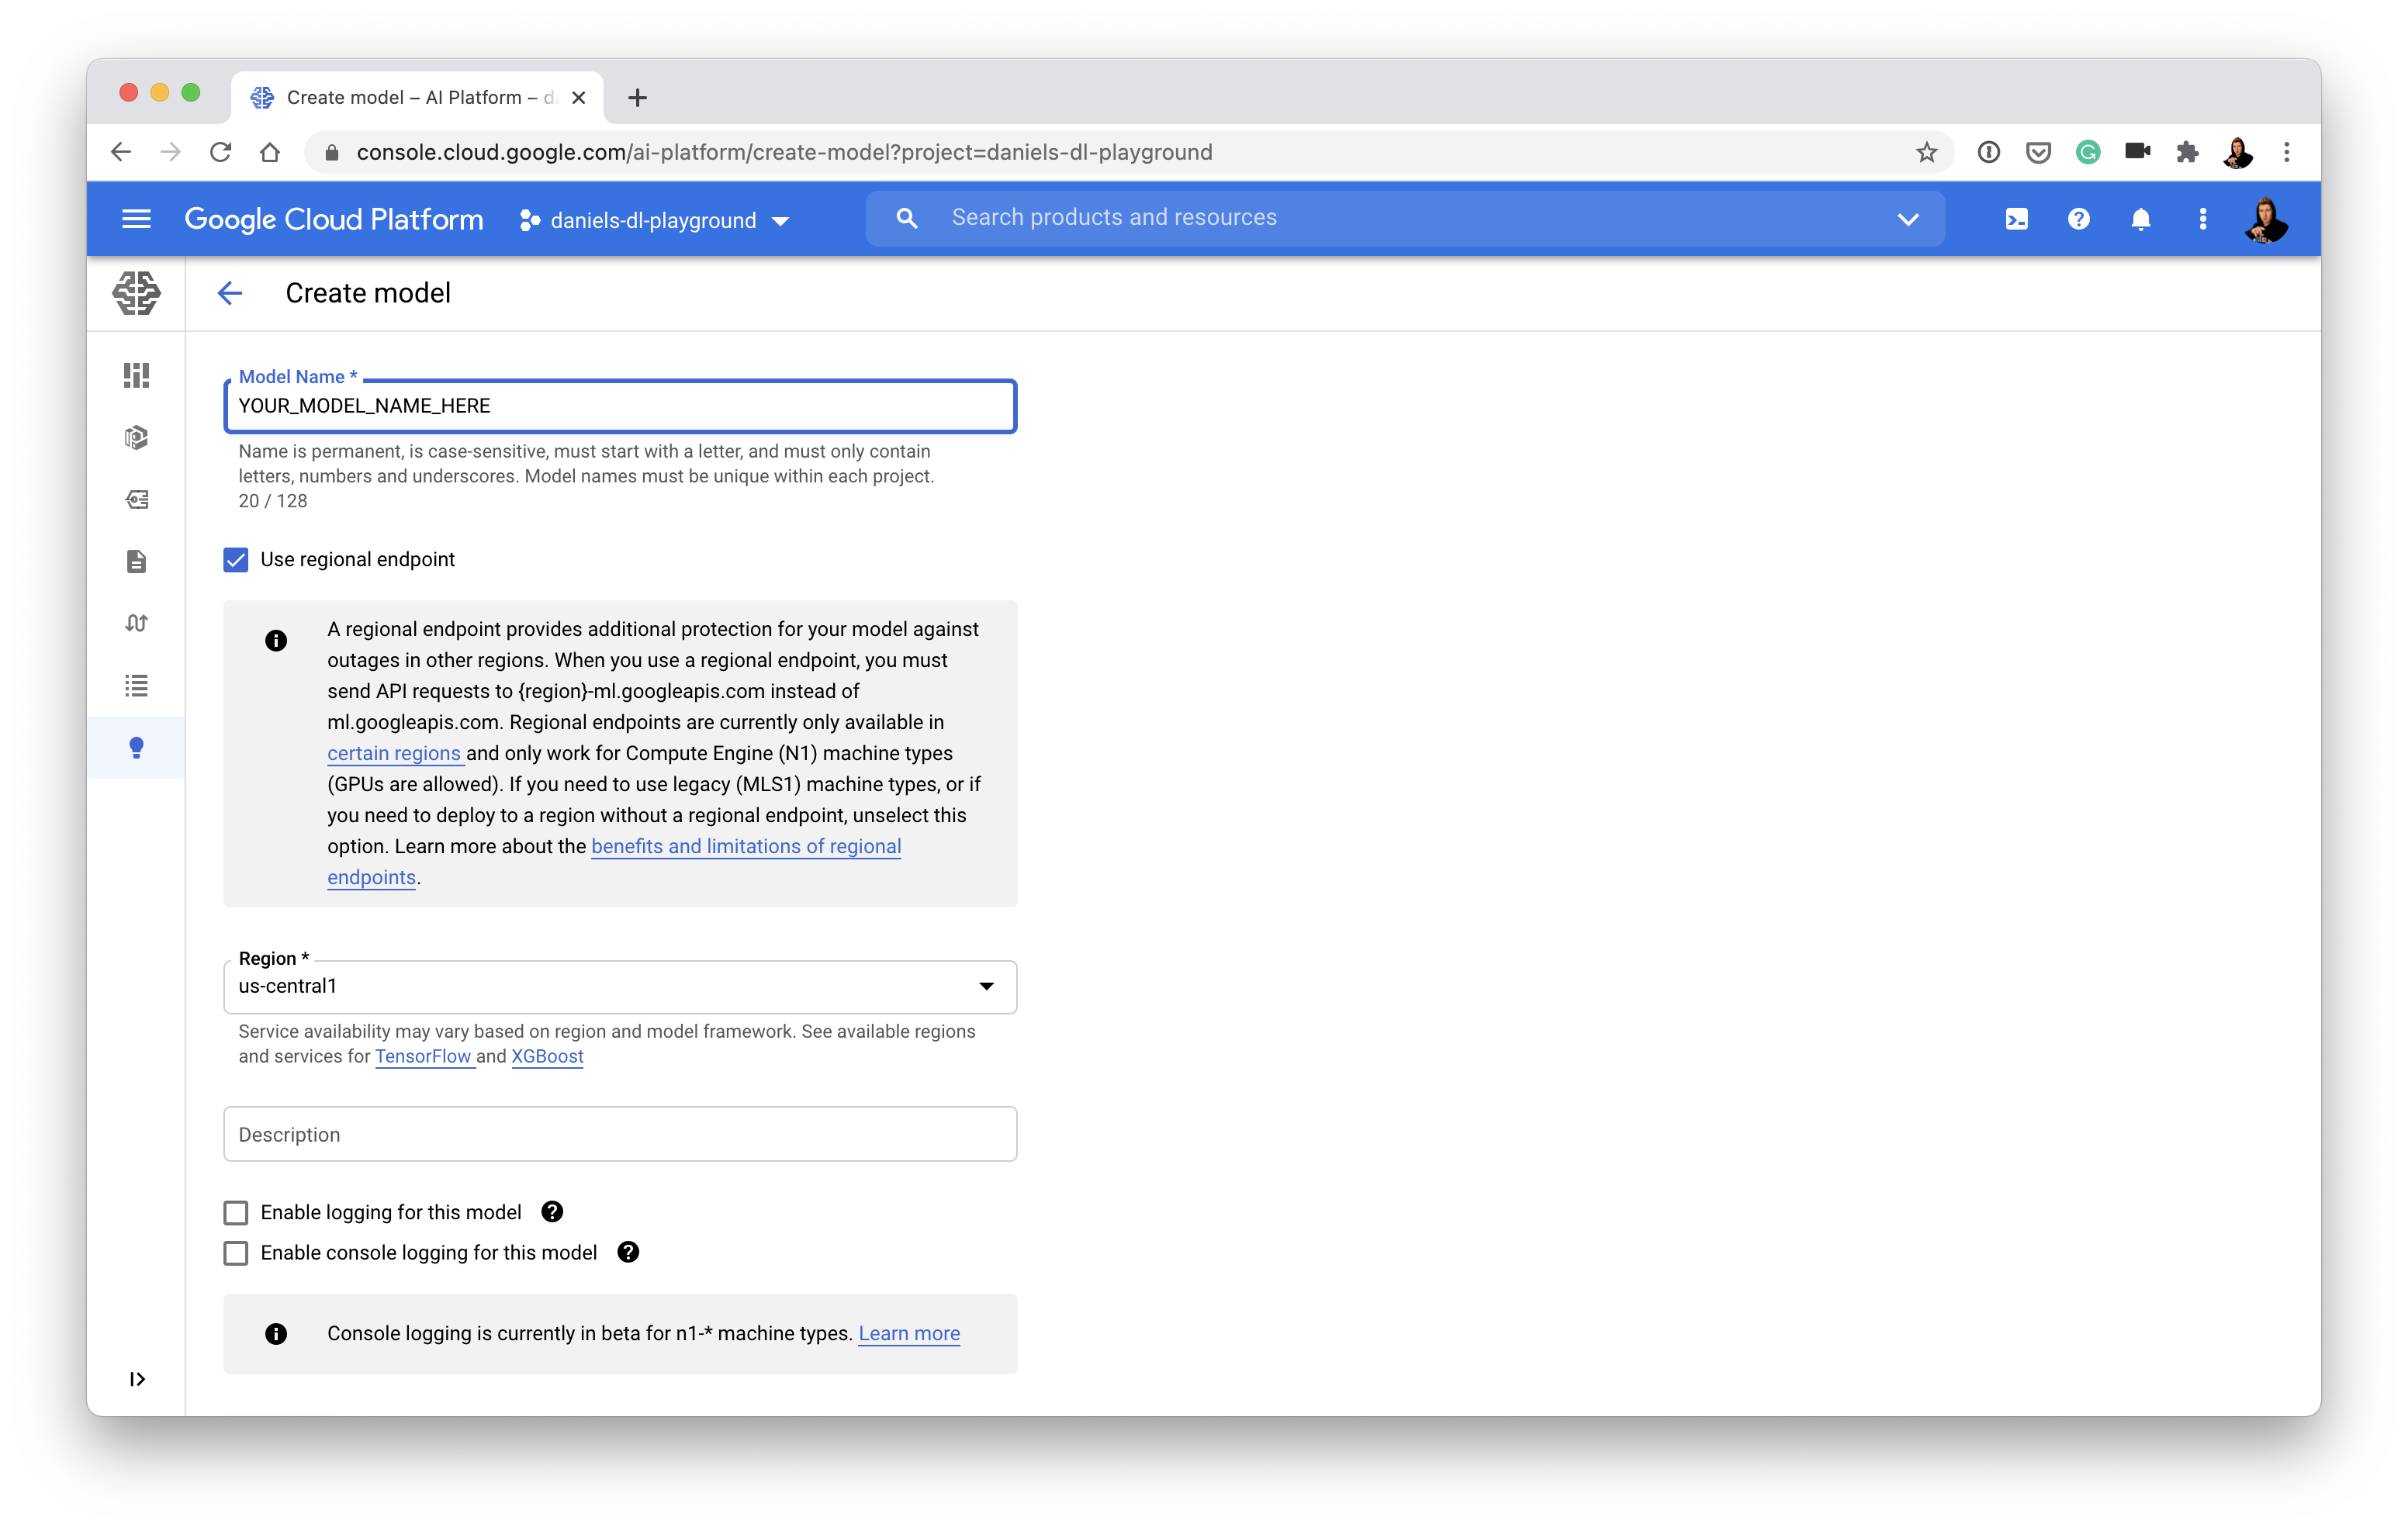
- Once you've got a model on AI Platform (above), you'll need to create a model version which matches up with what your model was trained with (e.g. choose TensorFlow if your model is trained with TensorFlow):
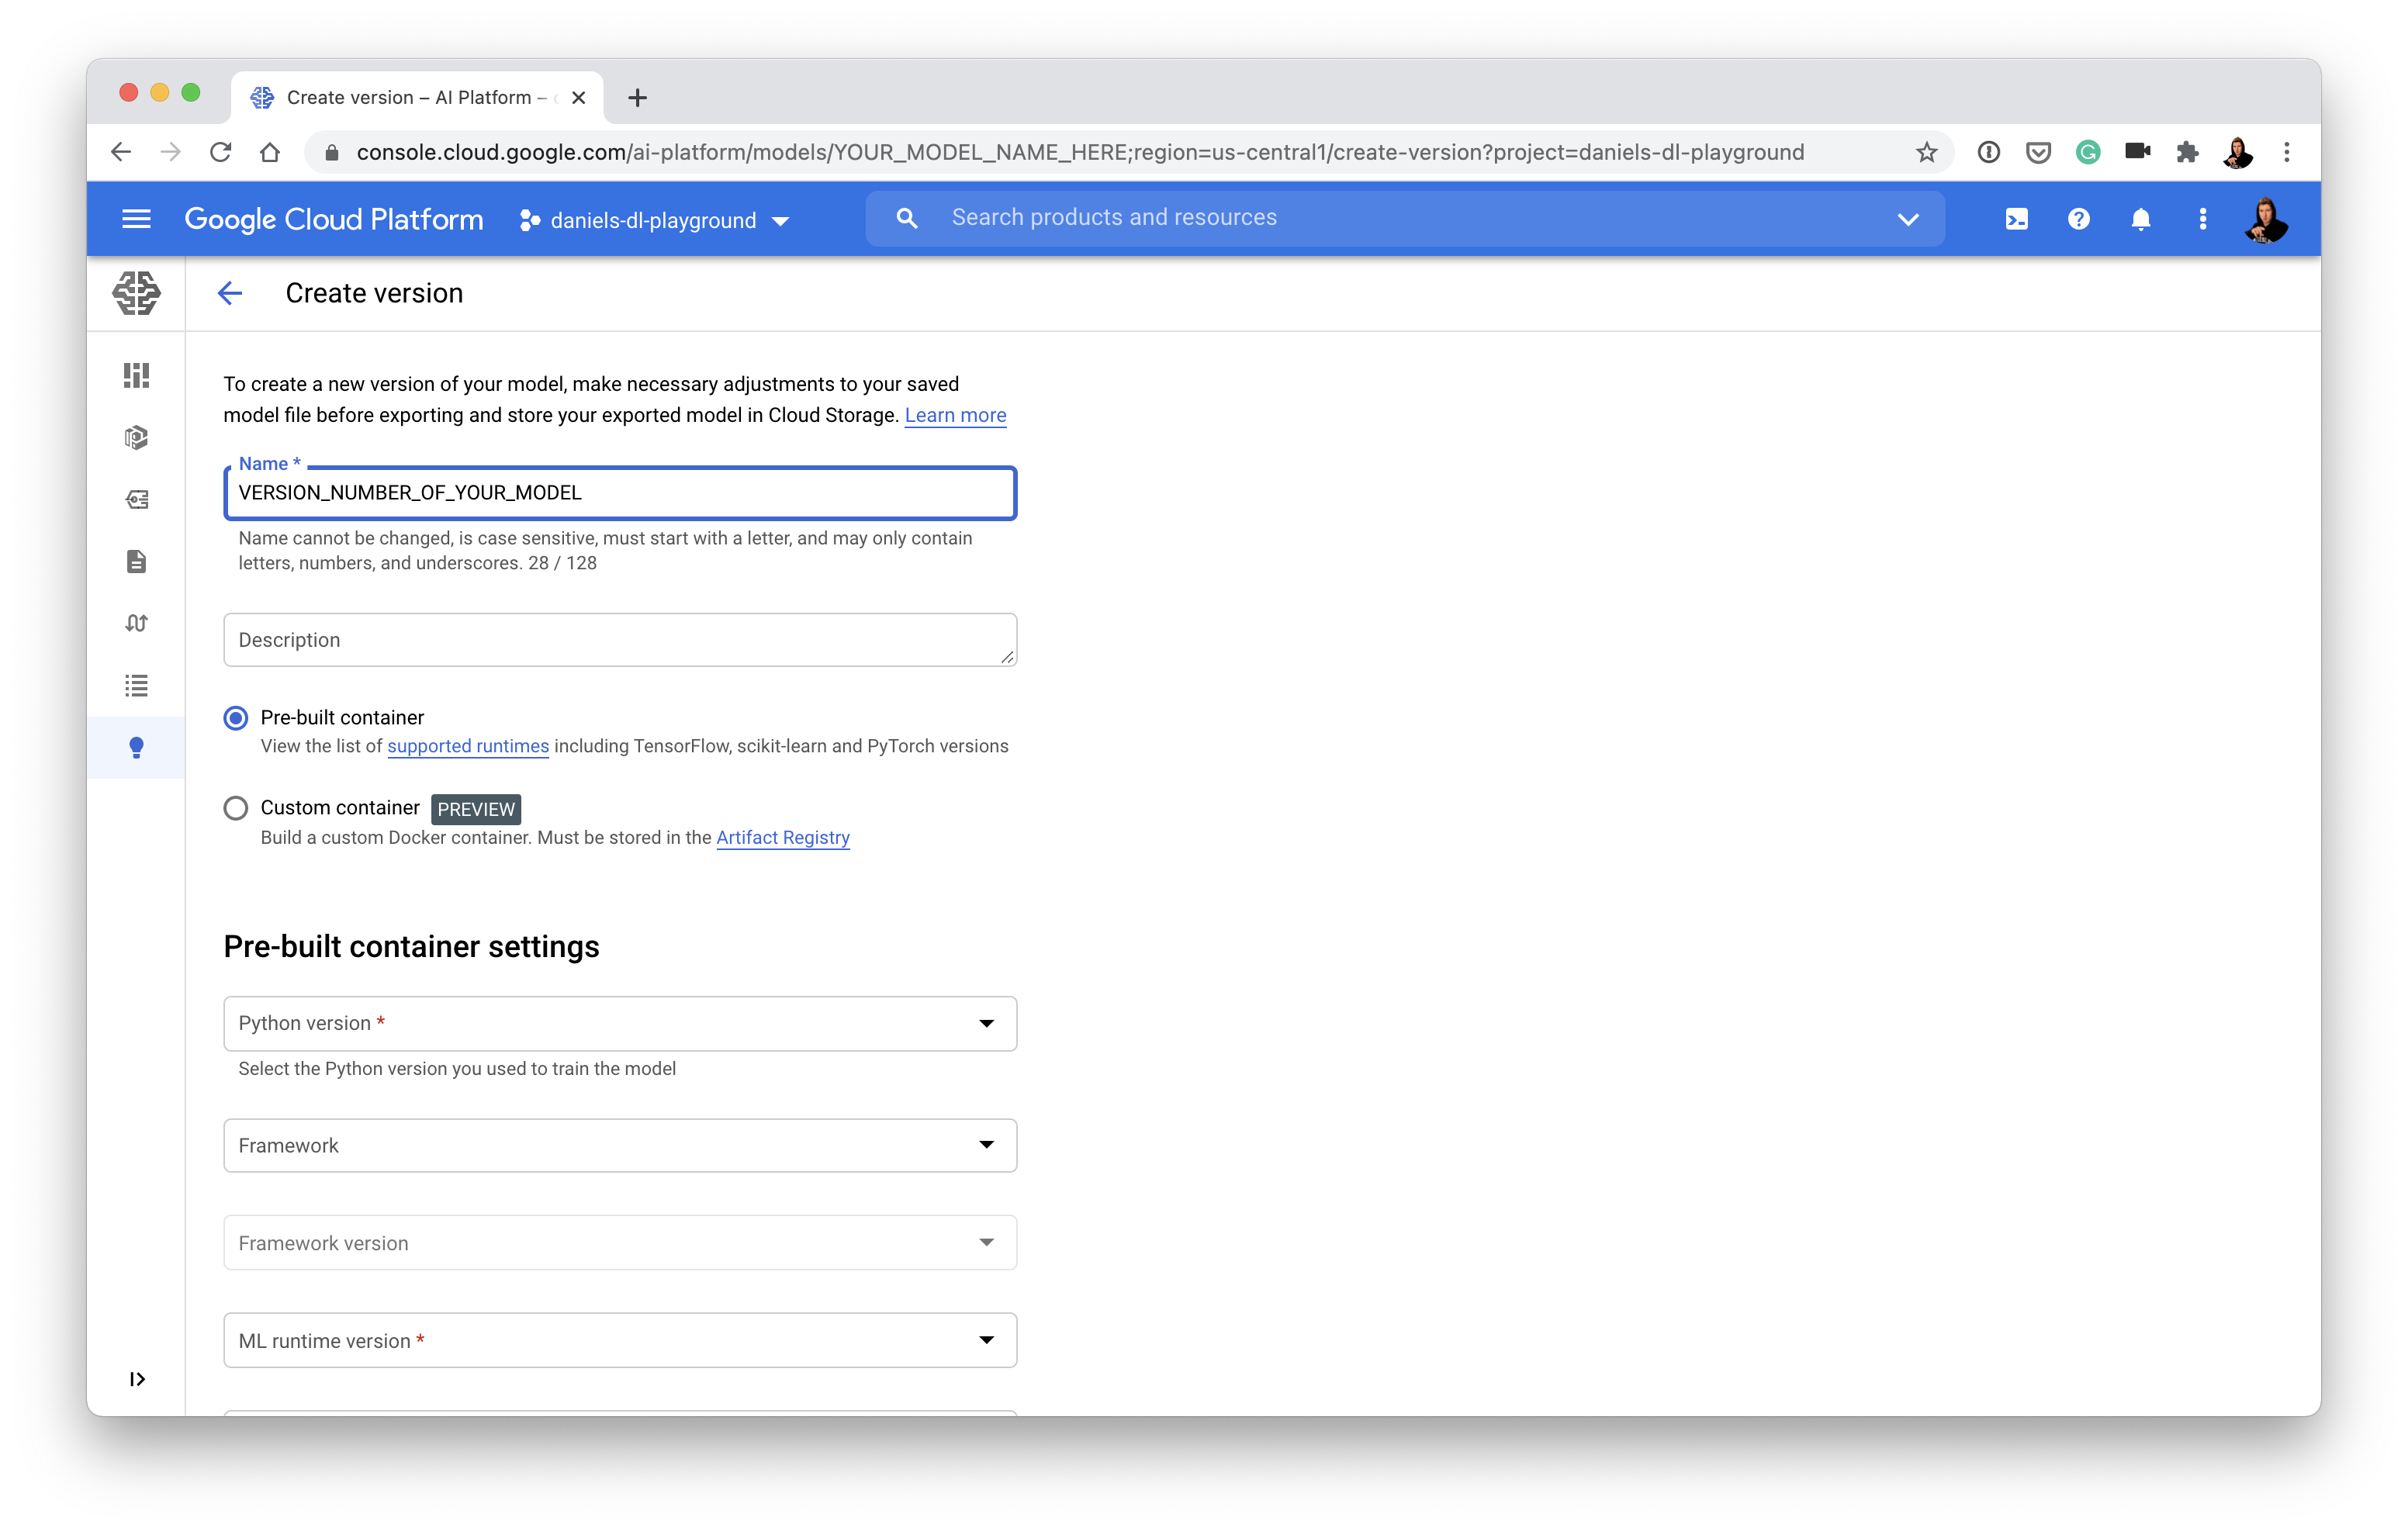
- And then link your model version to your trained model in Google Storage:
- Create a service account to access AI Platform (GCP loves permissions, it's for the security of your app)
- You'll want to make a service account with permissions to use the "ML Engine Developer" role
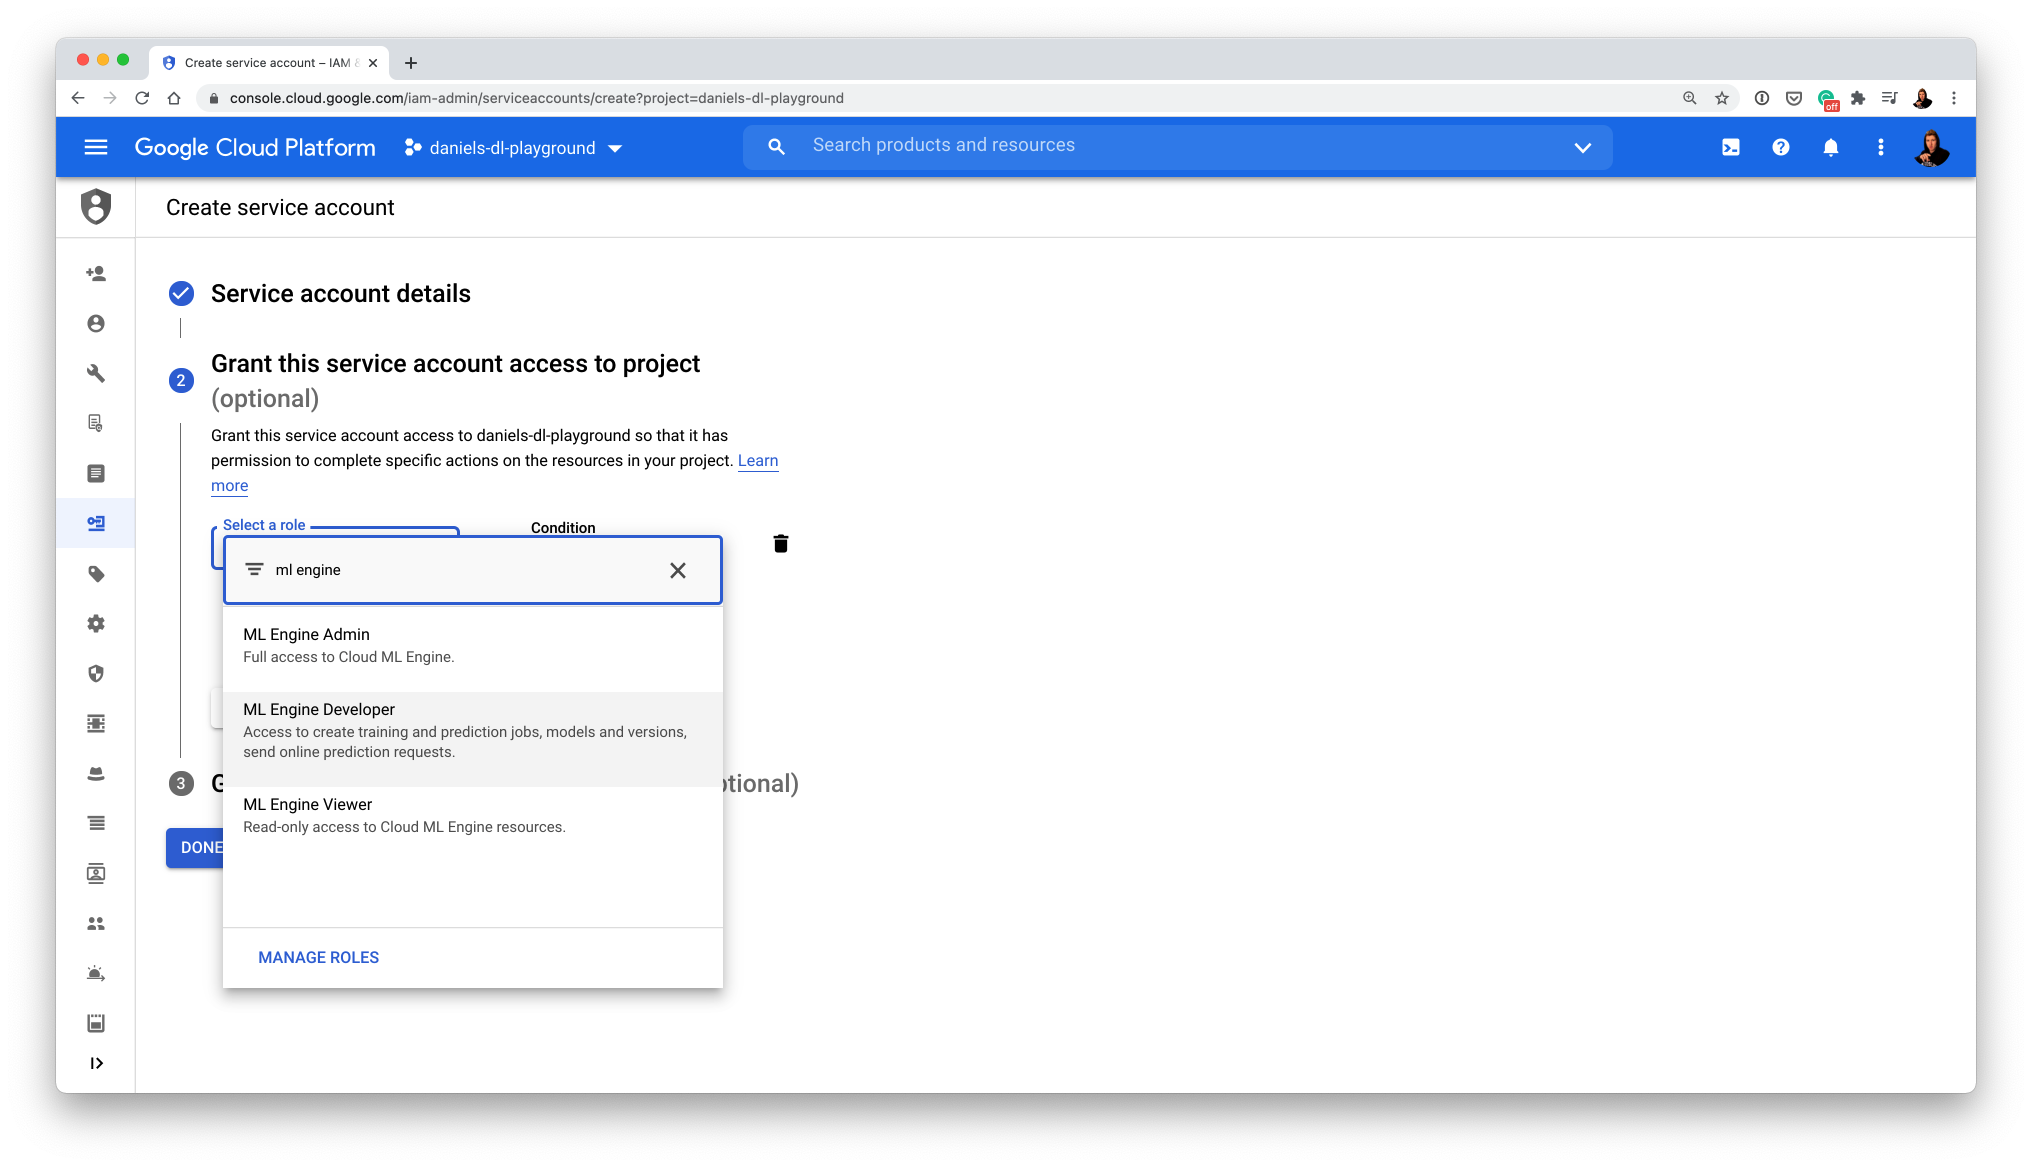
- Once you've got an active service account, create and download its key (this will come in the form of a .JSON file)
- 🔑 Note: Service keys grant access to your GCP account, keep this file private (e.g add
*.jsonto your.gitignoreso you don't accidently add it to GitHub)
- Update the following variables:
- In
app.py, change the existing GCP key path to your key path:
# Google Cloud Services look for these when your app runs

# Old
os.environ["GOOGLE_APPLICATION_CREDENTIALS"] = "daniels-dl-playground-4edbcb2e6e37.json"

# New
os.environ["GOOGLE_APPLICATION_CREDENTIALS"] = "<PATH_TO_YOUR_KEY>"
- In
app.py, change the GCP project and region to your GCP project and region
# Old
PROJECT = "daniels-dl-playground"
REGION = "us-central1"

# New
PROJECT = "<YOUR_GCP_PROJECT_NAME>"
REGION = "<YOUR_GCP_REGION>"
- In
utils.py, change the"model_name"key of"model_1"to your model name:
# Old
classes_and_models = {
   "model_1": {
       "classes": base_classes,
       "model_name": "efficientnet_model_1_10_classes"
   }
}

# New
 classes_and_models = {
   "model_1": {
       "classes": base_classes,
       "model_name": "<YOUR_AI_PLATFORM_MODEL_NAME>"
   }
}
- Retry the app to see if it works (refresh the Streamlit app by pressing R or refreshing the page and then reupload an image and click "Predict")
3. Deploying the whole app to GCP
Okay, I've fixed the permissions error, how do I deploy my model/app?
I'm glad you asked...
- run
make gcloud-deploy... wait 5-10 mins and your app will be on App Engine (as long as you've activated the App Engine API)
...and you're done
But wait, what happens when you run
make gcloud-deploy?
When you run make gcloud-deploy, the gcloud-deploy command within the Makefile (food-vision/Makefile) gets triggered.
make gcloud-deploy is actually an alias for running:
gcloud app deploy app.yaml
This is gcloud's way of saying "Hey, Google Cloud, kick off the steps you need to do to get our locally running app (food-vision/app.py) running on App Engine."
To do this, the gcloud app deploy command does a number of things:
- Our app is put into a Docker container defined by
[food-vision/Dockerfile](imagine a Docker container as a box which contains our locally running app and everything it needs to run, once it's in the box, the box can be run anywhere Docker is available and it should work and the Dockerfile defines how the container should be created). - Once the Docker container is created, it becomes a Docker image (confusing, I know but think of a Docker image as an immutable Docker container, e.g. it won't change when we move it somewhere).
- The Docker image is then uploaded to Google Container Registry (GCR), Google's place for hosting Docker images.
- Once our Docker image is hosted on GCR, it gets deployed to an App Engine instance (think a computer just like ours but running online, where other people can access it).
- The App Engine instance is defined by the instructions in
food-vision/app.yaml, if you check out this file you'll notice it's quite simple, it has two lines:
runtime: custom # we want to run our own custom Docker container
env: flex # we want our App Engine to be flexible and install our various dependencies (in requirements.txt)
Seems like a lot right?
And it is, but once you've had a little practice which each, you'll start to realise there's a specific reason behind each of them.
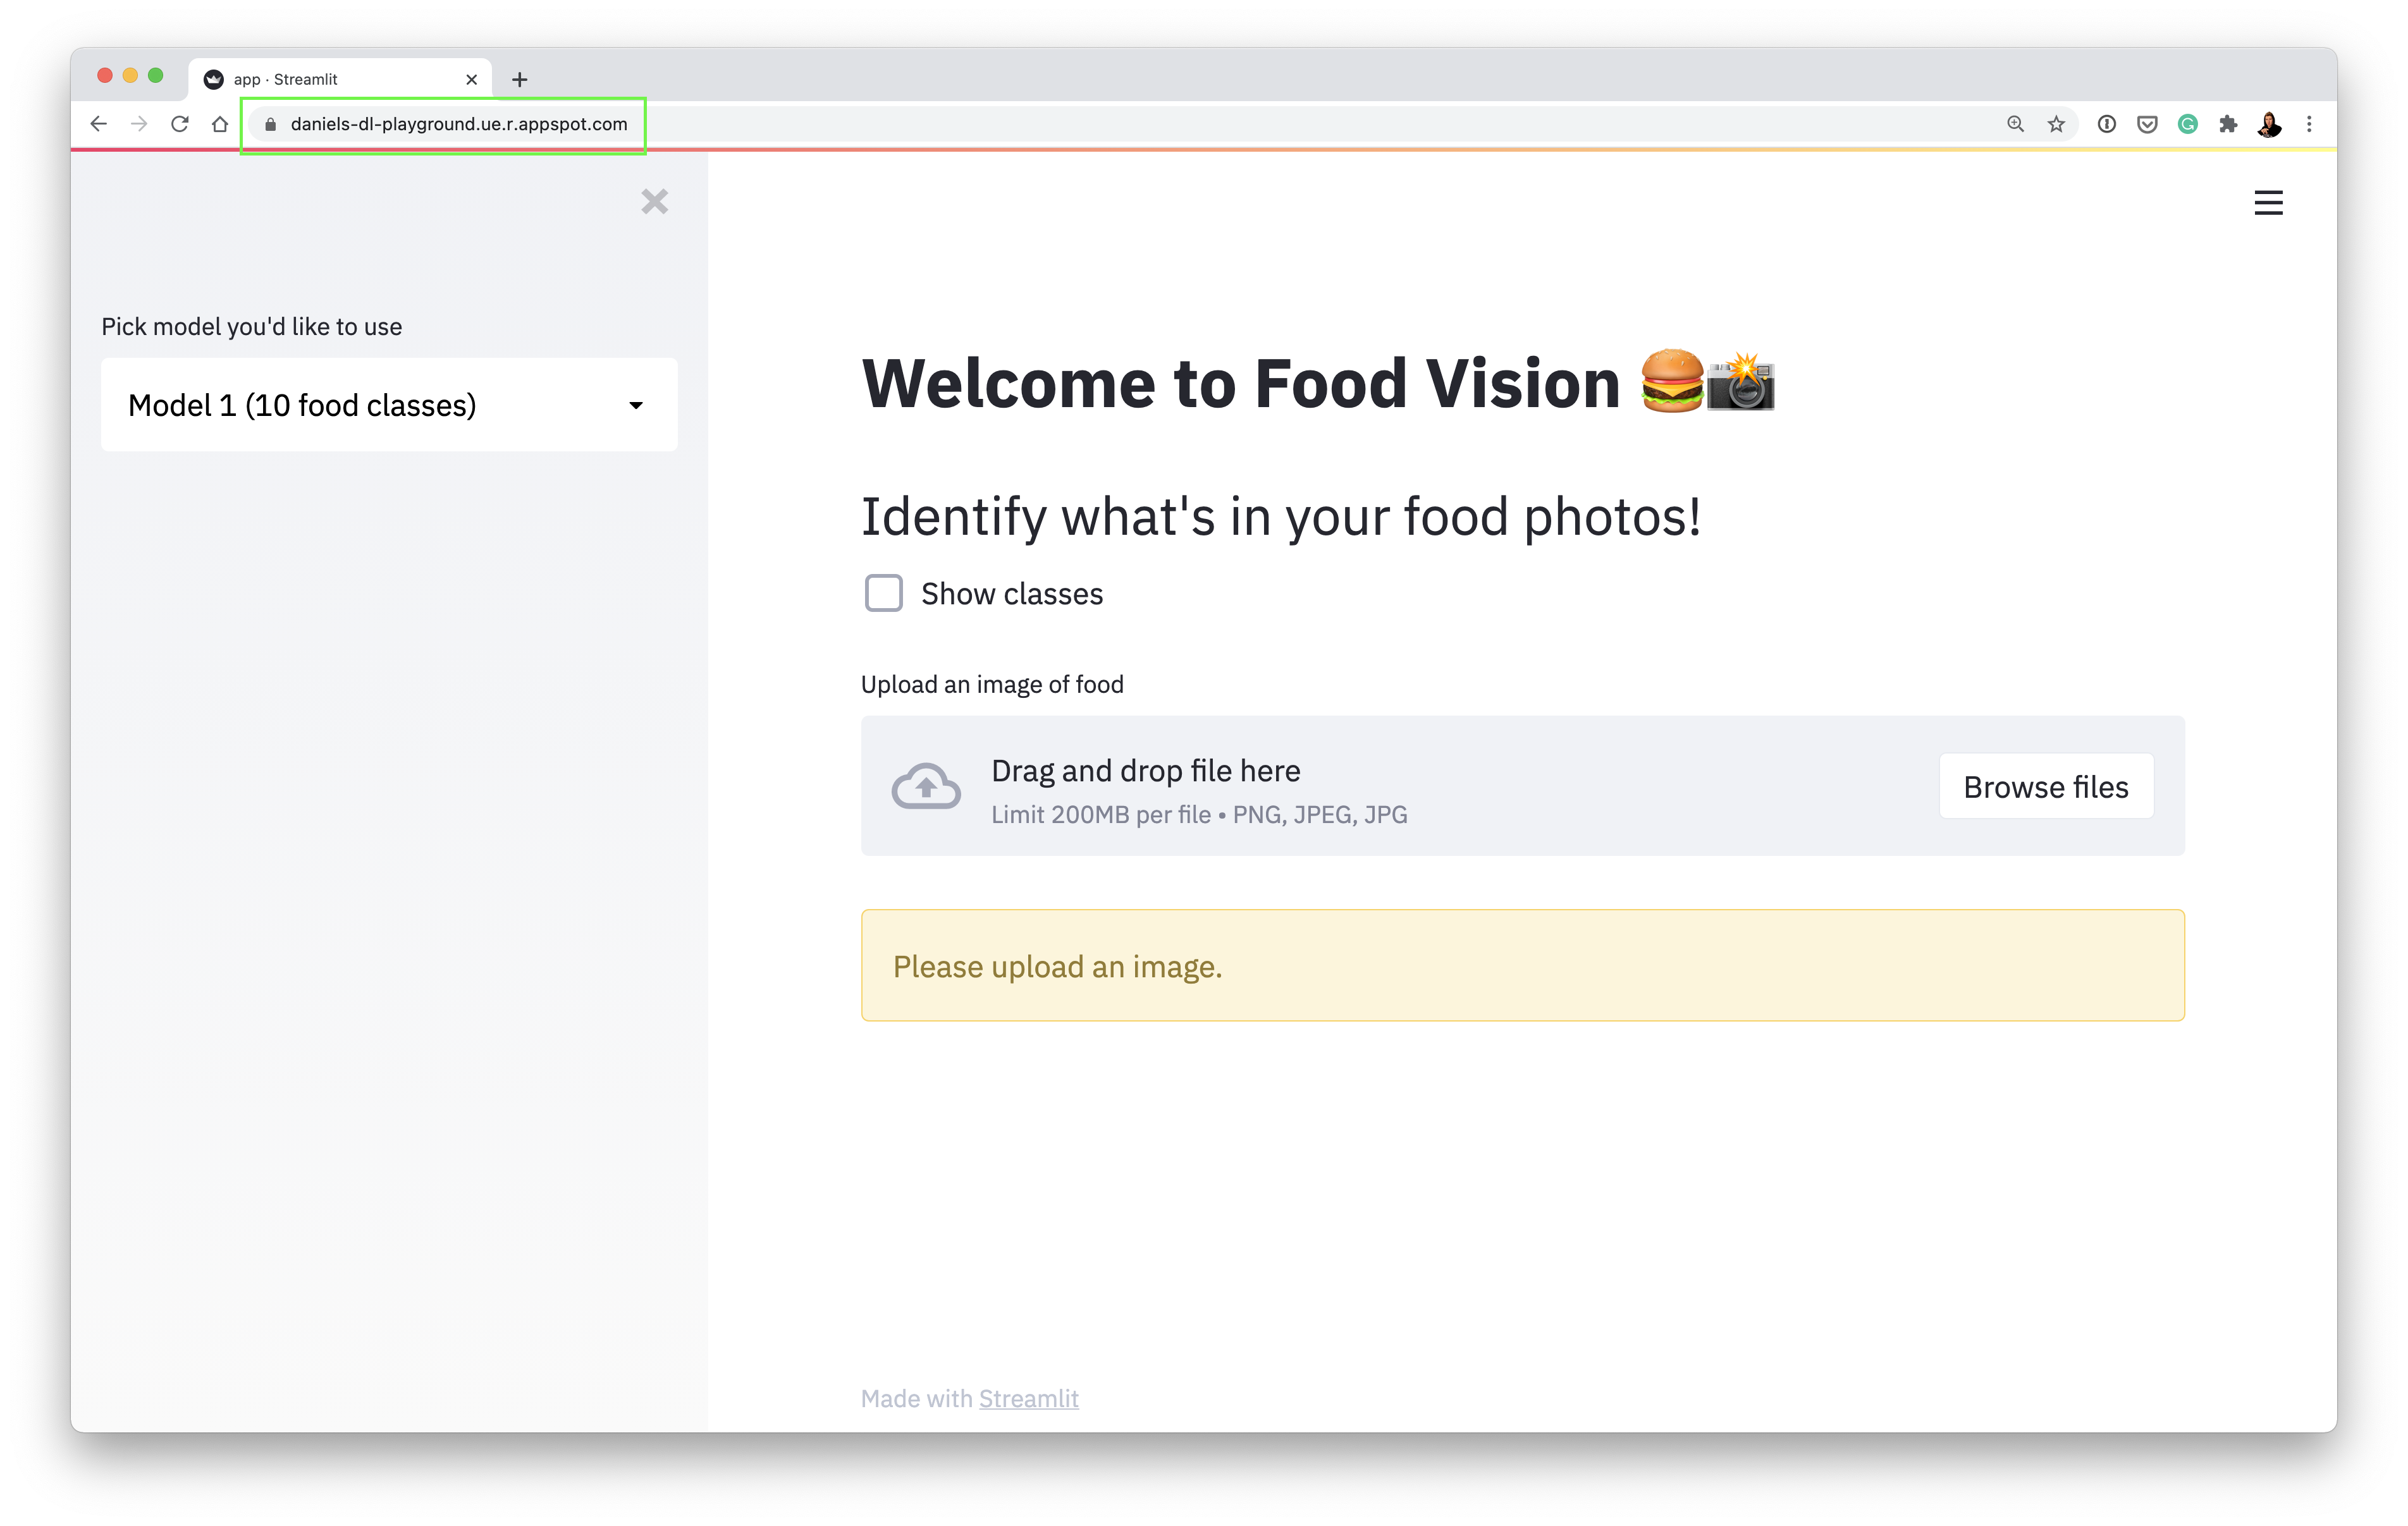
If all the steps executed correctly, you should see your app running live on App Engine under a URL similar to:
http://<YOUR_PROJECT_NAME>.ue.r.appspot.com/
Which should look exactly like our app running locally!
Breaking down food-vision
What do all the files in
food-visiondo?
There's a bunch of files in our food-vision directory and seeing them for the first time can be confusing. So here's a quick one-liner for each.
-
.dockerignore- files/folders to ignore when are Docker container is being created (similar to how.gitignoretells what files/folders to ignore when committing. -
Dockerfile- instructions for how our Docker container (a box with all of what our app needs to run) should be created. -
Makefile- a handy script for executing commands likemake gcloud-deployon the command which run larger commands (this saves us typing large commands all the time, see What is a Makefile? for more). -
SessionState.py- a Python script to help our Streamlit app maintain state (not delete everything) when we a click a button, see the Streamlit forums for more. -
app.py- our Food Vision 👁🍔 app built with Streamlit. -
app.yaml- the instructions for what type of instance App Engine should create when we deploy our app. -
requirements.txt- all of the dependencies required to runapp.py. -
utils.py- helper functions used inapp.py(this prevents our app from getting too large).
Where else your app will break
During the tutorial (see timestamp 1:32:31), we saw the app we've deployed is far from perfect and we saw a couple of places where our app will break, but there's one more:
The default app (the on you'll get when you clone the repo) works with 3 models:
- Model 1: 10 food classes from Food101.
- Model 2: 11 food classes from Food101.
- Model 3: 11 food classes Food101 + 1 not_food class (random images from ImageNet).
All of these models can be trained using model_training.ipynb, however, if you do have access to all 3, your app will break if you choose anything other than Model 1 in the sidebar (the app requires at least 1 model to run).
Learn more
Where can I learn all of this?
Just like there's an infinite way you can construct deep learning neural networks with different layers, what we've done here is only one way you can deploy machine learning models/applications with Google Cloud (other cloud services have similar offerings as well).
If you'd like to learn more about Google Cloud, I'd recommend Google's Qwiklabs, here you'll get hands-on experience using Google Cloud for different uses-cases (all for free).
If you'd like more about how software engineering crosses over with machine learning, I'd recommend the following blogs:
- LJ Miranda's How to improve software engineering skills as a researcher
- Mark Douthwaite's software engineering and machine learning blog
For more on the concept of the "data flywheel" (discussed during the tutorial), check out Josh Tobin's talk A Missing Link in the Machine Learning Infrastrcuture Stack.
Extensions
How can I extend this app?
CI/CD - you'll hear this a lot when you start building and shipping software. It stands for "continuous integration/continuous delivery". I think of it like this, say you make a change to your app and you'd like to push it to your users immediately, you could have a service such as GitHub Actions watch for changes in your GitHub repo. If a change occurs on a certain branch, GitHub Actions performs steps very similar to what we've done here and redeploys your (updated) app automatically.
- Mark Douthwaite has a great blog post on CI/CD with GitHub Actions.
Codify everything! - when deploying our app, we did a lot of clicking around the Google Cloud console, however you can do all of what we did using the gcloud SDK, this means you could automate everything we've done and make the whole process far less manual!
Questions?
Start a discussion or send me a message: daniel at mrdbourke dot com.
